


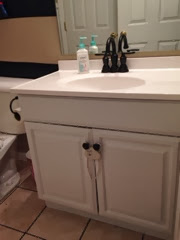
 This was a builders grade oak last year when I painted it white. Still sooo blah, just not my style. I painted back over the stripes, did a faux granite on the countertop and stained/distressed the vanity. I plan on painting the grout lines, adding a frame around the mirror, adding "feet" to the vanity & some moldings to give it a custom look.

 Yes.. That board and batten IS straight. It's just the angle of the picture.


 I used nothing special on the vanity. I know some had said there's a kit you can buy but I am much too cheap for that. I wanted to use what I had on hand. I used regular sand paper that you can pick up at the dollar store for a $1. Roughed up the edges then stained a couple times with Rustoleum wood stain in Willow. I LOVE the way it turned out.
  Spray it with cooking spray so your egg will slip right out. Pam is probably suggested but I buy the cheapie Dollar Tree stuff (works just as good to me).
  Crack your egg & put it into your fab lil cup. This polka dot is one of my favs!! I have enjoyed many cups of hot cocoa in it.
  Wisk that baby up! If you don't have one then a fork will work too. I found this cute little thing at the Dollar Tree as well.. Love the Dollar Tree as if you couldn't already tell.
  After a minute in the microwave it is done. Yeah!! Totally saved me time as well. Love it! I feel like I have been missing out! Tastes just like those "rubber" eggs back from school breakfast.. I used to love them! SO delish! Complete on my whole wheat bagel.
 Now to find some awesome kiddie games for him. I wish I could just go with an old school Nintendo and Mario cart ha! Now i have no idea what else to get him.. What do you get a big THREE year old?! Geez.. He is growing up so fast! Unreal.
  Hello, Gorgeous! Leopard & Argyle print?!? Yes!!!
  And let's talk about those fab candles.. Another thing I can use year round. Honey, as long as it doesn't have a big ol' Santa clause on it I'm thinking no one will notice it's for Holiday use.
  See that crown ornament in the corner?! I totally hung it on the wall! I think it looks great! It matches my decor perfectly.. And again, you cannot tell it's an ornament haha! Even if you could.. I prob wouldn't care, but that's just me.
  When I started this collage wall I knew there was something missing, but the space was SO small. I just couldn't figure out what I could possibly put there, totally scored that crown.
  SO jealous that I wasn't able to scoop up one of the leopard letters.. Or 2 or 3. I would have LOVED to spell out "Eat" for the top of my cabinets! Oh! Dang it.. They had a ton of pretties left for 80% off though so I got lucky. Love my Leopard bow (that I made into a wreath!)
  Can you tell it's for a Christmas tree?! Yeah, me neither! It only cost around a buck or so, you cannot purchase to ribbon to make it for that. Oh how I adore being frugal! It's actually fun to challenge yourself, I love decorating on a budget.

 I cannot wait to paint this beauty white!! It will look awesome.. At least I'm hoping. I found this at a local Peddlers Mall (thrift store). I plan on attaching it to the wall, putting the flat screen on the wall above it, & painting the wall in the middle black.
 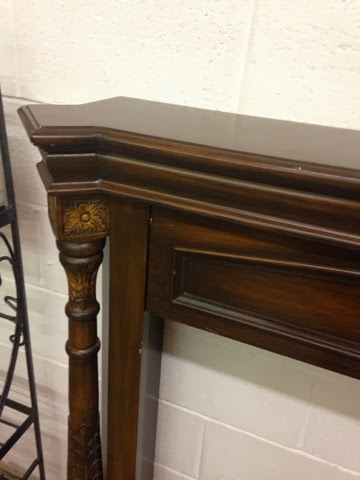 I LOVE the detail & this baby is huge!! Perfect!
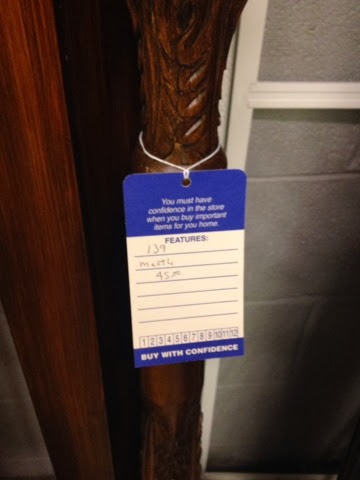
 It has a great base & is super sturdy! I definitely recommend searching your local Goodwill or thrift shops before paying retail. This was only $25 bucks.. What a steal!
  Some may even want to leave it the finish that it already is.. I'm just not a fan. I love darker wood or crisp white! I'm a lover of the whole shabby chic look.
  Yep.. My new chair covers are still wrinkled. I'll get right on that. Ha! I scored these for $5 bucks each at a Peddler's Mall (thrift store)! They look much better in person.. Promise.
  I'm totally upset right now, I was at a Goodwill not long ago & ran across a gorgeous, gorgeous, gorgeous rug! It was similar to the one I have but round.. Which I need for this table. I'm trying to save as much floor space as possible. I have an eat-in kitchen so space is an issue. Plus do you see that door?!? That's my laundry "closet"! Eeekkkk..... Exactly why I needed my gigantic table GONE.
  The only picture I could find of the other table. We bought it before we purchased this house a few years ago.
  Yep.. That's my kid mid run in the corner.
  Okay enough of these ugly beige things. Onto the new fab beauties. I would love to have real granite but would I also like the price tag? That's a big ol negative..... Ha! It's too bad our house didn't come with them, if yours did, count yourself very LUCKY! And please know how extremely jealous I am.. That is all. Moving on..
  THIS is what you'll see while you're in the process.. Terrifying right?! Uhm yeah.. I almost ran. I thought I had totally messed up my kitchen. But with a little prayer & technique (Uhm just kidding, there's no technique, just GO with the flow) I was able to follow through with it. I used a paper plate for my paint, simply because I'm not paying extra $$ for some fancy something to squirt my paint onto.. I'm cheap, very. Or frugal? Whatever.
  "Is this girl REALLY posting pictures with dirty dishes in her sink?!?!" Why he's darling.. I am. Someone made the remark that it looks like a coon with muddy paws had been let loose in here, id have to agree. Josh seen this & I was sure that I wasn't going to make it through the project, just kidding. He just couldn't see what I seen! I knew these would turn out amazing.. Or so I had prayed. Those beige countertops had potential after all. I'm a total slacker, here is where I should tell you that there SHOULD be tape protecting the backsplash.
  I used 2 different browns & patted my sponge onto them like this. It mixes up the colors so it isn't so blah!
  The paints I used are just cheapies from Walmart.. I don't have a fancy craft store in my small town. Black, antiqueish white, dark brown, lighter brown, and gold.. Simple enough, right? I would totally tell you the exact names of these paints but I'm too lazy to get off my booty to go get them.. Just zoom in on the picture.
  You're technically supposed to use a natural sea sponge.. Well, I found a super small pack of "natural" sea sponges at Walmart but some (insert bad word here) took 2 of the 5 out of the package. Are we SERIOUS?!?! The only package they have in stock.. So I went to the bath section, I found a sea sponge! Not exactly what I had in mind but hey, whatever works! I cut corners wherever possible (saves $$). It was around $3 bucks, it's cheaper than the natural sponge anyway.. Maybe it was meant to be.
  FINALLY it started to come together.. Lawd I was getting scared. I promise, it's worth it. Just keep working.
  Yes that's a towel between my cabinets, because who has time to tape up news paper?!? Remember when I said I cut corners? Ha.. I wasn't kidding.
  Oh hey.. There's that package of sponges. After I began to read on the package I realize there's supposed to be 5 sponges, I then realize there's a hole in the mesh.. Awesome. Place that back on a random shelf (don't act like you've never done this). There's the Polycrylic I used, it seals in all the paint. I did 4-5 coats. Don't mind that roller, I didn't end up using it. I used a foam brush (super cheap!).
  This project was super cheap.. My kinda peoject. Rough estimate of the cost:


